Torque IRC Client
A multi-part tutorial
By:
Harold ďLabRatĒ Brown
Introduction
††††††††††††††† This tutorial will cover the information you need to write a basic IRC client for the Torque Game Engine.† As you go through the tutorial you will learn how to use each of the different components needed to connect to an IRC server, Display the channel list, join a channel, see the chat and see the list of people in that channel with you.† Along the way, we will be exploring uses of the individual components that themselves can be expanded into useful or unique features.
Part 1 Ė TCP Object
††††††††††††††† The first object we will learn about is the TCP Object.† This one object has many uses, both for connecting to remote servers and for hosting servers.† In this segment, we will cover how to create a TCP object, what functions you can perform with it, and what functions it will trigger while it is being used.
††††††††††††††† First we will create a TCP Object, to do so we need to drop down the console window by pressing the ~ key (Figure 1).
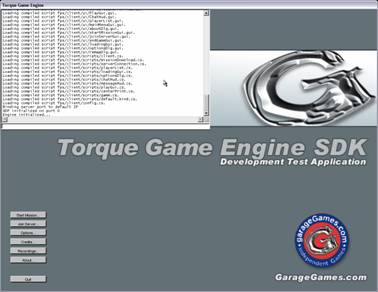
Figure 1
††††††††††††††† Once you have the console window open type the following:
new tcpobject(tcpobj);
††††††††††††††† This will create a TCP object named ďtcpobjĒ that can be referenced by that name.† Now that we have a TCP Object created, you will need to know what you can do with it.† The TCP Object has four commands unique to it, and several others that most objects in Torque share.† To see the list of all commands type tcpobj.dump(); To see the list (Figure 2)
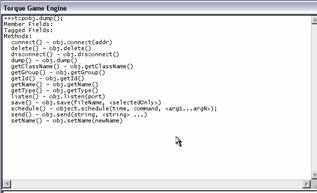
Figure 2
.
The four commands that are specific to this control are; connect, disconnect, send and listen.† Of these four commands, we will only be working with the first three, as the listen function is currently a bit buggy.
We will work with the connect function first, if you look at the function reference from the dump, we just did, you can see that this function accepts one argument and that is the address.† This is actually a bit misleading, as it also requires a port to connect to.† Therefore, to connect to a telnet server we would need the address and the default telnet port (23)
tcpobj.connect(ď127.0.0.1:23Ē);
††††††††††††††† Of course, you will not see anything regardless of a good connection or not, so we need to disconnect before we go on.† This covers our next command and is done as follows
tcpobj.disconnect();
††††††††††††††† Right now, you are probably thinking to yourself, ďOK that was uselessĒ.† You are right it is.† A TCP Object is useless without the functions that it triggers when connecting and receiving information.† There are six functions that can be triggered during the connect process and one that can be triggered during when in the listen state.† Those functions are as follows:
function TCPObject::onDNSResolved(%this)
function TCPObject::onDNSFailed(%this)
function TCPObject::onConnected(%this)
function TCPObject::onConnectFailed(%this)
function TCPObject::onDisconnect(%this)
function TCPObject::onLine(%this, %line)
//Only while in a listen state
function TCPObject::onConnectRequest(%this,%address,%tag)
††††††††††††††† To see how these work we will need to create a file named tcpobject.cs.† Open your ďMy ComputerĒ window and browse to your torque example folder.† Double-click on the common folder and create a new file, then name it tcpobject.cs.† Open this file in your favorite text editor and put the following (Figure 3):
function TCPObject::onDNSResolved(%this)
{
††††† echo("DNS Resolved");
}
function TCPObject::onDNSFailed(%this)
{
††††† echo("DNS Failed");
}
function TCPObject::onConnected(%this)
{
††††† echo("Connected");
}
function TCPObject::onConnectFailed(%this)
{
††††† echo("Connection Failed");
}
function TCPObject::onDisconnect(%this)
{
††††† echo("Disconnected");
}
function TCPObject::onLine(%this, %line)
{
††††† echo("TCP: " @ %line);
}
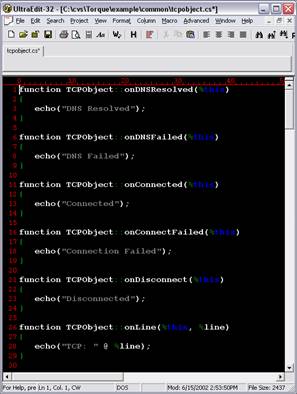
Figure 3
††††††††††††††† Save the file and if you still have your Torque window open, close it now.† We will now want to start Torque so it can recognize the new file.† Once we have Torque open we will want to execute the file, we just created to load the functions into memory.† Open the console window again and type:
exec(ďcommon/tcpobject.csĒ)
††††††††††††††† Now that the file is loaded into memory, we will want to explore how these functions work. First weíll try to connect to a port we know doesnít exist.
new tcpobject(tcpobj);
tcpobj.connect(ď127.0.0.1:9999Ē);
††††††††††††††† We should get a message that says ďConnection FailedĒ, this will be useful for trying connections to multiple servers or just as we used it now to show that, the connection did not succeed.† Next, we will want to see a successful connection. Since we already have a TCP Object initialized we only need to do the connect function.† For this example, we will be using the IP address for www.microsoft.com, and port 80 since we know they are running a web server.
tcpobj.connect("207.46.230.220:80");
††††††††††††††† You should get a message that says ďConnectedĒ, this will be useful for automatically performing commands on connection such as security handshakes or to make a request for information.† The other possible connection string is to use the domain name in the connect string like so.
tcpobj.connect("www.microsoft.com:80");
††††††††††††††† This should give you two messages. The first being ďDNS ResolvedĒ and the second message should be the ďConnectedĒ message.† You may also receive ďDNS FailedĒ followed by ďConnection FailedĒ.† These four functions can be used to expand the capabilities of your project by automating connection retries, and handling successful connections.
††††††††††††††† Once we have, a connection the fifth function (online) will handle information received from the server.† To see how it works we need to send something to the server to get a response to display.† Since we are connected to the Microsoft web server, let us see what will happen when we request the root page by sending an HTTP GET command with the TCP Object send function.
tcpobj.send("GET / \r\n");
††††††††††††††† You will notice we ended the string with ď\r\nĒ, when dealing with TCP connections this combination is very important, it sends the Carriage Return, Line Feed pair to the server.† That will make the server you are connected to execute the command you just sent, in our case it tells the Microsoft server to send us the default webpage for ď/Ē or the root directory.† On your screen, you should have seen a lot of text scroll by prefixed by ďTCP:Ē those lines are the html text for the default webpage.† Our current functions just echo the lines out prefixed by ďTCP:Ē we could just as easily saved the lines to a file, or parsed each line looking for information.
Part 2 Ė A simple sample
††††††††††††††† Now that we know how the basics of the TCP Object work, we will work on a simple example of a common TCP connection.† For our first sample, we will be working with the Daytime Protocol (RFC-867) on TCP port 13.† More specifically, we will be working with the NIST (National Institute of Standards and Technology - http://www.boulder.nist.gov) version of this protocol.
Daytime Protocol (RFC-867)
This protocol is widely used by small computers running MS-DOS and similar operating systems. The server listens on port 13, and responds to requests in either tcp/ip or udp/ip formats. The standard does not specify an exact format for the Daytime Protocol, but requires that the time is sent using standard ASCII characters. NIST chose a time code format similar to the one used by its dial-up Automated Computer Time Service (ACTS), as shown below:
JJJJJ YR-MO-DA HH:MM:SS TT L H msADV UTC(NIST) OTM
where:
ß JJJJJ is the Modified Julian Date (MJD). The MJD is the last five digits of the Julian Date, which is simply a count of the number of days since January 1, 4713 B.C. To get the Julian Date, add 2.4 million to the MJD.
ß YR-MO-DA is the date. It shows the last two digits of the year, the month, and the current day of month.
ß HH:MM:SS is the time in hours, minutes, and seconds. The time is always sent as Coordinated Universal Time (UTC). An offset needs to be applied to UTC to obtain local time. For example, Mountain Time in the U. S. is 7 hours behind UTC during Standard Time, and 6 hours behind UTC during Daylight Saving Time.
ß TT is a two digit code (00 to 99) that indicates whether the United States is on Standard Time (ST) or Daylight Saving Time (DST). It also indicates when ST or DST is approaching. This code is set to 00 when ST is in effect, or to 50 when DST is in effect. During the month in which the time change actually occurs, this number will decrement every day until the change occurs. For example, during the month of October, the U.S. changes from DST to ST. On October 1, the number will change from 50 to the actual number of days until the time change. It will decrement by 1 every day until the change occurs at 2 a.m. local time when the value is 1. Likewise, the spring change is at 2 a.m. local time when the value reaches 51.
ß L is a one-digit code that indicates whether a leap second will be added or subtracted at midnight on the last day of the current month. If the code is 0, no leap second will occur this month. If the code is 1, a positive leap second will be added at the end of the month. This means that the last minute of the month will contain 61 seconds instead of 60. If the code is 2, a second will be deleted on the last day of the month. Leap seconds occur at a rate of about one per year. They are used to correct for irregularity in the earth's rotation. The correction is made just before midnight UTC (not local time).
ß H is a health digit that indicates the health of the server. If H=0, the server is healthly. If H=1, then the server is operating properly but its time may be in error by up to 5 seconds. This state should change to fully healthy within 10 minutes. If H=2, then the server is operating properly but its time is known to be wrong by more than 5 seconds. If H=4, then a hardware or software failure has occurred and the amount of the time error is unknown.
ß msADV displays the number of milliseconds that NIST advances the time code to partially compensate for network delays. The advance is currently set to 50.0 milliseconds.
ß The label UTC(NIST) is contained in every time code. It indicates that you are receiving Coordinated Universal Time (UTC) from the National Institute of Standards and Technology (NIST).
ß OTM (on-time marker) is an asterisk (*). The time values sent by the time code refer to the arrival time of the OTM. In other words, if the time code says it is 12:45:45, this means it is 12:45:45 when the OTM arrives.
††††††††††††††† Now that we know what to expect as a return message from the server let us start writing the functions we will need to get the current time from a NIST timeserver.† First, we will want to create a new file called timecheck.cs in the common folder of our Torque Example folder.† Open the timecheck.cs file in your text editor and add the following.† We will be using the NIST timeserver at ďtime-a.nist.govĒ if you wish to use another time server you can find more servers at http://www.boulder.nist.gov/timefreq/service/time-servers.html
function TimeCheck()
{
††††† %obj = new TCPObject(TimeCheck);†††
††††† %obj.connect("time-a.nist.gov:13");
}
††††††††††††††† Save the file and if you havenít done so yet, close your Torque Engine and open it again to recognize the new file.† Once it is open type the following.
exec(ďcommon/tcpobject.csĒ);
exec(ďcommon/timecheck.csĒ);
††††††††††††††† We want to execute the tcpobject.cs file, as the functions we added are the base functions and will be called for any TCP Object regardless of the name.† Now that we have, the files loaded run the timecheck function.
TimeCheck();
††††††††††††††† You should get a line that looks like:
52441 02-06-16 06:20:31 50 0 0 268.3 UTC(NIST)
††††††††††††††† If we break this down using the specification posted above, we see that we are interested in the second, third, and fourth ďwordsĒ in this line.† They tell us that it is 6:20 and 31 seconds GMT on June 16, 2002.† With this information, we can create a custom ďonLineĒ function for our TimeCheck TCP object.
function TimeCheck::onLine(%this, %line)
{††††
††††† if(%line !$= "")
††††† {
††††††††††† echo("Julian Date is: " @ getword(%line,0));
††††††††††† echo("The Date is: " @ getword(%line,1));
††††††††††† echo("The Time in UTC is: " @ getword(%line,2));
††††††††††† if ( getword(%line,3) $= "50" )
††††††††††† {
††††††††††††††††† echo("Time is Daylight Savings Time (DST)");
††††††††††† }
††††††††††† else
††††††††††† {
††††††††††††††††† echo("Time is Standard Time (ST)");
††††††††††† }††††
††††† }
}
††††††††††††††† Now when we run the ďTimeCheckĒ function we will get 4 lines that look like the following:
Julian Date is: 52441
The Date is: 02-06-16
The Time in UTC is: 06:20:31
Time is Daylight Savings Time (DST)
††††††††††††††† Now that we have this working, we need to take care of some cleanup requirements.† Every time you create a new object, it stays in memory so we will need to delete the object when we are done with them.† The easiest way to do that is to use the ďonDisconnectedĒ event and automatically handle the delete.
function TimeCheck::onDisconnect(%this)
{
††††† %this.delete();
}
††††††††††††††† This function will trigger when you disconnect from the server, it will delete the TimeCheck TCP Object so it is not sitting around any longer.† Once we have this function in our simple example is complete, we have a simple, but complete application that can be used to pull the current time and display it.
Part 3 Ė Another simple sample
††††††††††††††† Our next example is a bit more complex, it is an implementation of the POP3- RFC 1939 protocol (http://www.faqs.org/rfcs/rfc1939.html).† Although this will be, a very basic implementation that only returns the number of messages on the pop3 server.† I will not explain in detail everything we are doing, as by now you should be familiar with the process.
††††††††††††††† We will start with the function to create the pop3 TCP object and connect to the mail server.
function MailCheck(%server,%user,%pass)
{
††††† %obj = new TCPObject(MailCheck);
††††† %obj.user = %user;
††††† %obj.pass = %pass;
††††† %obj.connect(%server @ Ē:110");
}
††††††††††††††† This function will create a new TCPObject called MailCheck, it will then add two new fields to the MailCheck object named user and pass, these will hold the Username and Password for the POP3 account we will be accessing.† You will understand the reasoning behind this when we get to the ďonlineĒ function, which follows now.
function MailCheck::onLine(%this, %line)
{††††
††††† if(%line !$= "")
††††† {
††††††††††† if(getword(%line,0) $= "+OK")
††††††††††† {
††††††††††††††††† switch$( getword(%line,1) )††
††††††††††††††††† {
††††††††††††††††††††††† case "POP3":
††††††††††††††††††††††††††††† %this.send("USER " @ %this.user @ "\r\n");
††††††††††††††††††††††† case "User":
††††††††††††††††††††††††††††† %this.send("PASS " @ %this.pass @ "\r\n");
††††††††††††††††††††††† case "Mailbox":
††††††††††††††††††††††††††††† echo(getwords("You have" @ %line,3));
††††††††††††††††††††††††††††† %this.disconnect();††††††††††††††††††††††
††††††††††††††††††††††† default:
††††††††††††††††††††††††††††† echo("Response not handled");
††††††††††††††††† }
††††††††††† }
††††† }
}
††††††††††††††† Like I said I wonít go into great detail on how this works.† Once we connect the POP3 server will send a line that starts with ď+OK POP3Ē when we receive that we will know we are connected and we will then send our user name in response, then the Password when the Username is acknowledged.† Once we have logged in with our username and password the system will send us a line telling us how many messages are in our mailbox.† We will echo this message and then disconnect.
††††††††††††††† As you should remember from our previous sample when we disconnect us will want to clean up our TCP object, so we will need to add the delete on disconnect function.
function MailCheck::onDisconnect(%this)
{
††††† %this.delete();
}
††††††††††††††† After that we are done.† If you read the RFC for POP3, you will se there are many several other possible commands we could use.† In addition, we will get to those in the next installment of this tutorial series when we cover some of the basic GUI commands and how to interface them with scripts.